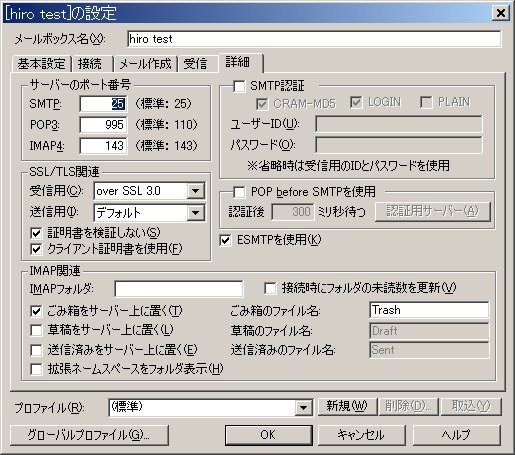
Dovecotは、POP3/IMAP over SSL/TSLを実現することが出来るモジュールである。メールサーバが遠隔地にある場合には、特にメール自体のセキュリティが問題になる。POP認証のパスワードはもちろんのことメール本文にも認証を行いSSLによる暗号化が可能となる。SSLとTLSの違いは、SSLは単なる暗号化技術にすぎない。しかし、TLSはデータをSSL暗号化してさらに、公開鍵暗号や秘密鍵暗号、デジタル証明書、ハッシュ関数などのセキュリティ技術を組み合わせ、データの盗聴や改ざん、なりすましを防ぐことができる。
セットアップマシン環境 )
マシン:Celeron 600MHz
OS:Slackware10
前提条件として )
OpenSSLがインストールされていること。
1.Dovecotのインストール
はじめに、DovecotはFedoraCore5についてはバイナリが用意されてるようだ。したがって、yum install dovecotでインストールできるだろう。
1)ソースをゲットする
Dovecotは、ここ に有るが、この記事を書く時点(2006年7月)では dovecot-1.0.rc2.tar.gz が最新で有った。
root@hiro:/usr/local/src# wget http://dovecot.org/releases/dovecot-1.0.rc2.tar.gz
2)展開する
root@hiro:/usr/local/src# groupadd dovecot
root@hiro:/usr/local/src# useradd -g dovecot -d /dev/null -s /bin/false dovecot
root@hiro:/usr/local/src# tar zxvf dovecot-1.0.rc2.tar.gz
root@hiro:/usr/local/src# chown -R root.root dovecot-1.0.rc2
3)コンパイル&ビルド
root@hiro:/usr/local/src# cd dovecot-1.0.rc2
root@hiro:/usr/local/src/dovecot-1.0.rc2# ./configure
省略
Install prefix …………………. : /usr/local
File offsets …………………… : 64bit
I/O loop method ………………… : poll
File change notification method ….. : dnotify
Building with SSL support ……….. : yes (OpenSSL)
Building with IPv6 support ………. : yes
Building with pop3 server ……….. : yes
Building with mail delivery agent .. : yes
Building with GSSAPI support …….. : no
Building with user database modules . : static prefetch passwd passwd-file checkpassword (modules)
Building with password lookup modules : passwd passwd-file shadow pam checkpassword (modules)
Building with SQL drivers …………:
root@hiro:/usr/local/src/dovecot-1.0.rc2# make
root@hiro:/usr/local/src/dovecot-1.0.rc2# make install
root@hiro:/usr/local/src/dovecot-1.0.rc2# mv /usr/local/etc/dovecot-example.conf /usr/local/etc/dovecot.conf ←実際は一行で
2.設定する
1)証明書を作るための情報を設定する
root@hiro:/usr/local/src/dovecot-1.0.rc2# cd doc
証明書を作るための情報を入力
root@hiro:/usr/local/src/dovecot-1.0.rc2/doc# vi dovecot-openssl.cnf
[ req ]
default_bits = 1024
encrypt_key = yes
distinguished_name = req_dn
x509_extensions = cert_type
prompt = no
[ req_dn ]
# country (2 letter code)
C=JP
# State or Province Name (full name)
ST=都道府県名
# Locality Name (eg. city)
L=市町村名
# Organization (eg. company)
O=会社等の組織名
# Organizational Unit Name (eg. section)
OU=部署などの詳細な組織グループ
# Common Name (*.example.com is also possible)
CN=サーバFQDN
# E-mail contact
emailAddress=管理者メールアドレス
2)証明書&鍵置き場を作る
証明書置き場を作る(opensslをインストールすると自動的に作られるが念のため)。
root@hiro:/usr/local/src/dovecot-1.0.rc2/doc# mkdir -p /etc/ssl/certs
秘密鍵置き場を作る(opensslをインストールすると自動的に作られるが念のため)。
root@hiro:/usr/local/src/dovecot-1.0.rc2/doc# mkdir /etc/ssl/private
3)証明書&鍵を作る
root@hiro:/usr/local/src/dovecot-1.0.rc2/doc# sh ./mkcert.sh
証明書と鍵を作る作業をやり直す場合は、/etc/ssl/certs/dovecot.pemと/etc/private/ssl/private/dovecot.pemの両方を消してからやり直すこと。
4)Dovecotを起動するための設定ファイルを編集する
バージョン1.2.x以降のdovecot.confの設定。
root@hiro:/usr/local/src/dovecot-1.0.rc2/doc# vi /usr/local/etc/dovecot.conf
#protocols = pop3 pop3s
#セキュリティのためにPOP3サービスを停める(995でのみ運用)
protocols = pop3s
auth_debug = yes
disable_plaintext_auth = no
#メールサーバのタイプと受信メールの格納フォルダを明記
mail_location = mbox:~/mail:INBOX=/var/spool/mail/%u
#セキュリティ証明書の保存先を明記
ssl_cert_file = /etc/ssl/certs/dovecot.pem
ssl_key_file = /etc/ssl/private/dovecot.pem
#default_mail_env =
protocol imap {
}
protocol pop3 {
pop3_uidl_format = %u
}
protocol lda {
postmaster_address = postmaster@xxxxxxxx.com
}
auth default {
mechanisms = plainpasswdb pam
↓パスワードはシャドーであるため
passdb shadow {
}
userdb passwd {
}
user = root
}
dict {
}
plugin {
}
3.Dovecotを起動する
1)起動
root@hiro:/usr/local/src/dovecot-1.0.rc2/doc# /usr/local/sbin/dovecot
注:初めて起動した時は、Warningが出て止まってしまうが、二回目から正常起動する。
2)起動プロセス確認
root@hiro:/usr/local/src/dovecot-1.0.rc2/doc# ps -ef
省略
root 16360 1 0 17:36 ? 00:00:00 /usr/local/sbin/dovecot
root 16361 16360 0 17:36 ? 00:00:00 dovecot-auth
dovecot 16365 16360 0 17:36 ? 00:00:00 imap-login
dovecot 16366 16360 0 17:36 ? 00:00:00 imap-login
dovecot 16367 16360 0 17:36 ? 00:00:00 imap-login
dovecot 16381 16360 0 17:42 ? 00:00:00 pop3-login
dovecot 16383 16360 0 17:42 ? 00:00:00 pop3-login
dovecot 16398 16360 0 17:43 ? 00:00:00 pop3-login
省略
root@hiro:/usr/local/src/dovecot-1.0.rc2/doc# tail /var/log/maillog
省略
Sep 24 15:31:59 sub dovecot: pop3-login: Login: user=<xxxx>, method=PLAIN, rip=192.168.255.250, lip=192.168.255.101, TLS
Sep 24 15:32:00 sub dovecot: POP3(mity): Disconnected: Logged out top=0/0, retr=4/27549, del=4/4, size=27480
4.起動スクリプトの作成と起動
# vi /etc/init.d/dovecot
#!/bin/bash
# chkconfig: 2345 65 35
# description: Dovecot POP3S Server
# processname: dovecot
# Source function library.
. /etc/rc.d/init.d/functions
test -x /usr/local/sbin/dovecot || exit 0
RETVAL=0
prog=”Dovecot POP3S”
start() {
echo -n $”Starting $prog: “
daemon /usr/local/sbin/dovecot
RETVAL=$?
[ $RETVAL -eq 0 ] && touch /var/lock/subsys/dovecot
echo
}
stop() {
echo -n $”Stopping $prog: “
killproc /usr/local/sbin/dovecot
RETVAL=$?
[ $RETVAL -eq 0 ] && rm -f /var/lock/subsys/dovecot
echo
}
#
# See how we were called.
#
case “$1” in
start)
start
;;
stop)
stop
;;
reload|restart)
stop
start
RETVAL=$?
;;
condrestart)
if [ -f /var/lock/subsys/dovecot ]; then
stop
start
fi
;;
status)
status /usr/local/sbin/dovecot
RETVAL=$?
;;
*)
echo $”Usage: $0 {condrestart|start|stop|restart|reload|status}”
exit 1
esac
exit $RETVA
# chmod 755 /etc/init.d/dovecot
# chkconfig –add dovecot
# chkconfig dovecot on
# chkconfig –list
amavisd 0:off 1:off 2:on 3:on 4:on 5:on 6:off
apache 0:off 1:off 2:off 3:off 4:off 5:off 6:off
clamd 0:off 1:off 2:on 3:on 4:on 5:on 6:off
dovecot 0:off 1:off 2:on 3:on 4:on 5:on 6:off
fcron 0:off 1:off 2:on 3:on 4:on 5:on 6:off
freshclam 0:off 1:off 2:on 3:on 4:on 5:on 6:off
mysql 0:off 1:off 2:off 3:off 4:off 5:off 6:off
pgsql 0:off 1:off 2:off 3:off 4:off 5:off 6:off
pop-before-smtp 0:off 1:off 2:off 3:off 4:off 5:off 6:off
postfix 0:off 1:off 2:on 3:on 4:on 5:on 6:off
postgrey 0:off 1:off 2:on 3:on 4:on 5:on 6:off
sshd 0:off 1:off 2:on 3:on 4:on 5:on 6:off
syslogd 0:off 1:off 2:on 3:on 4:on 5:on 6:off
xinetd 0:off 1:off 2:on 3:on 4:on 5:on 6:off
xinetd based services:
imap: off
pop3: off
proftpd: on
qpopper: off
# service dovecot start
5.MUAの設定(Becky!のばやい)
■ 基本的に、SSL/TLSをサポートしてるMUAであること。
■ 基本設定タブで、受信プロトコルをPOP3Sにチェックする。
■ 自己認証局を使うため警告画面が出る。OKをクリックする。
■ サーバのポート番号 POP3 995番へ変更。
■ SSL/TLS関連の設定で「証明書を検証しない。」のチェックボックスにチェックを入れる。
■ 受信用を over SSL 3.0もしくは、over TLSへ変更。

以上


コメント