

preludeは、ハイブリッド型侵入検知システムとでも言おうか、syslogや、各種アプリケーションが検出した攻撃の痕跡から侵入を検知するシステムである。ここでは、Debianのdebパッケージでインストールするけど source も有る。だから、コンパイル&ビルドしてインストールできそうだ。とりあえず設定関係がめんどくさいのでやっと立ち上がったところ迄を説明する。
インストール環境 )
OS:DebianGNULinux3.1Sarge
マシン:Dell PentiumⅡマシン
前提条件:
debパッケージのApache2とmysqlがインストールされていて、mysqlのrootユーザのパスワードまで設定されていること。
1.パッケージのインストール
jerry:~# apt-get install prelude-lml prelude-manager prelude-nids
2.preludeデータベースクリエート
jerry:~# /usr/sbin/prelude-manager-db-create.sh
So if you ever have a database running for another job
please think about taking it away, because this script
will install prelude as a dedicated database and you
could meet some troubles with your old bases.
Do you want to install a dedicated database for prelude ?
(y)es / (n)o : y
*** Phase 1/7 ***
Enter the type of the database [mysql|pgsql]: mysql
*** Phase 2/7 ***
Enter the name of the host where the database is running [localhost]: localhost
*** Phase 3/7 ***
Enter the port where the database is running [3306]: 3306
*** Phase 4/7 ***
Enter the name of the database that should be created to stock alerts [prelude]: prelude
*** Phase 5/7 ***
This installation script has to connect to your mysql database in order to create a user dedicated t
o stock prelude’s alerts
What is the database administrative user ? [root]: root
We need the password of the admin user “root” to log on the database.
By default under mysql, root has an empty password.
Please enter a password: xxxxxxx
Please confirm entered password: xxxxxxx
*** Phase 6/7 ***
We need to create a database user account that will be used by the Prelude Manager in order to acces
s the “prelude” database.
Username to create [prelude] : prelude
We need to set a password for this special “prelude” account.
This password will have to be used by prelude-manager to access the database.
Please enter a password: xxxxxxx
Please confirm entered password: xxxxxxx
*** Phase 7/7 ***
Please confirm those information before processing :
Database name : prelude
Database admin user: root
Database admin password: (not shown)
prelude owner user: prelude
prelude owner password: (not shown)
Is everything okay ? (yes/no) : yes
Creating the database prelude…
————– End of Database Support Installation ————-
If it succeeded, you should now be able to launch prelude-manager like that :
==> prelude-manager –mysql –dbhost localhost –dbname prelude –dbuser prelude –dbpass xxxxxx
Or you may modify the prelude-manager configuration file (/usr/local/etc/prelude-manager/prelude-man
ager.conf by default) in order to launch prelude-manager without database arguments:
———- cut here —>
[MySQL]
# Host the database is listening on.
dbhost = localhost;
# Port the database is listening on.
dbport = 3306;
# Name of the database.
dbname = prelude;
# Username to be used to connect the database.
dbuser = prelude;
# Password used to connect the database.
dbpass = xxxxxx;
<— cut here ———-
Replace xxxxxx by the password you choose for the manager account
—————————————————————–
3.設定ファイルの編集
1)prelude-manager.conf
jerry:~# /etc/prelude-manager/prelude-manager.conf
[MySQL]
# Host the database is listening on.
dbhost = localhost;
# Port the database is listening on.
dbport = 3306;
# Name of the database.
dbname = prelude;
# Username to be used to connect the database.
dbuser = prelude;
# Password used to connect the database.
dbpass = xxxxxxx;
省略
2)sensors-default.conf
jerry:~# /etc/prelude-sensors/sensors-default.conf
manager-addr = 127.0.0.1;
3)prelude-lml.conf
jerry:~# vi /etc/prelude-lml/prelude-lml.conf
manager-addr = 127.0.0.1;
4)prelude-nids.conf
jerry:~# vi /etc/prelude-nids/prelude-nids.conf
省略
manager-addr = 127.0.0.1;
省略
#
# Reassemble TCP data sent by client and server.
#
both;
4.preludeマネージャアカウントの設定
jerry:~# manager-adduser
Generated one-shot password is “xxxxxxxx“. ← ※
This password will be requested by “sensor-adduser” in order to connect.
Please remove the first and last quote from this password before using it.
– Waiting for install request from Prelude sensors…
↑ここで停止するので、コンソールをもう一つ開いて以下を実行する。
jerry:~# sensor-adduser –sensorname prelude-lml –uid 0 –manager-addr 127.0.0.1
Now please start “manager-adduser” on the Manager host where
you wish to add the new user.
Please remember that you should call “sensor-adduser” for each configured
Manager entry.
Press enter when done.
Please use the one-shot password provided by the “manager-adduser” program.
Enter registration one shot password : xxxxxxx ← ※印のパスワードをそのまま入れる。
Please confirm one shot password : xxxxxxx ← ※印のパスワードをそのまま入れる。
connecting to Manager host (127.0.0.1:5553)… Succeeded.
Username to use to authenticate : prelude
Please enter a password for this user : ← 適当なパスワード
Please re-enter the password (comfirm) : ← もう一度
Register user “prelude” ? [y/n] : y
Plaintext account creation succeed with Prelude Manager.
Allocated ident for prelude-lml@jerry: xxxxxxxxxxxxxxxxxx.
もう一度繰り返し、
jerry:~# manager-adduser
Generated one-shot password is “xxxxxxx“. ← ※
This password will be requested by “sensor-adduser” in order to connect.
Please remove the first and last quote from this password before using it.
– Waiting for install request from Prelude sensors…
↑ここで停止するので、コンソールをもう一つ開いて以下を実行する。
jerry:~# sensor-adduser –sensorname prelude-nids –uid 65534 –manager-addr 127.0.0.1
Now please start “manager-adduser” on the Manager host where
you wish to add the new user.
Please remember that you should call “sensor-adduser” for each configured
Manager entry.
Press enter when done.
Please use the one-shot password provided by the “manager-adduser” program.
Enter registration one shot password : xxxxxxx ← ※印のパスワードをそのまま入れる。
Please confirm one shot password : xxxxxxx ← ※印のパスワードをそのまま入れる。
connecting to Manager host (127.0.0.1:5553)… Succeeded.
Username to use to authenticate : prelude
Please enter a password for this user : xxxxxxx ← 適当なパスワード
Please re-enter the password (comfirm) : xxxxxxx ← もう一度
Register user “prelude” ? [y/n] : y
Plaintext account creation succeed with Prelude Manager.
Allocated ident for prelude-nids@jerry: xxxxxxxxxxxxxxxxxx.
5.prelude再起動
jerry:~# /etc/init.d/prelude-manager restart
jerry:~# /etc/init.d/prelude-lml restart
jerry:~# /etc/init.d/prelude-nids restart
6.prelude データベースのフロントエンドpiwiを入れる
jerry:~# apt-get install piwi
7.Apache2の設定
jerry:~# vi /etc/apache2/apache2.conf
省略
User www-data
Group www-data
省略
Alias /piwi/ “/usr/share/piwi/”
<Directory “/usr/share/piwi”>
Options ExecCGI FollowSymLinks
AllowOverride None
Order allow,deny
Allow from all
</Directory>
省略
DirectoryIndex index.html index.htm index.cgi index.pl
省略
セキュリティ的には、BASIC認証を掛けておくと良いでしょう。
8.ディレクトリにオーナーとグループを設定
jerry:~# chown -R www-data:www-data /usr/share/piwi
jerry:~# chown -R www-data:www-data /var/cache/piwi
jerry:~# chown -R www-data:www-data /etc/piwi/Profiles
jerry:~# chown -R www-data:www-data /etc/piwi/config.pl
9.Apache2再起動
jerry:~# /etc/init.d/apache2 restart
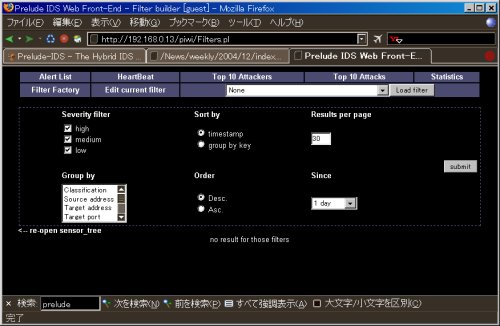
10.prelude実行画面
http://< ホスト名 >/piwi/
このURLへアクセスすると、以下図1のような画面が出る。使い方は、これからだよ。
以上

コメント